Completed projects:

roof, kitchen, master bedroom, main bathroom (sans shower tile), fireplace, hardwood flooring, windows, office, front entry, stairway

Ongoing projects:

shower surround, dapping/painting woodwork, ensuite vanity/lights/mirror, painting outdoor trim, finishing front entry tile work, interior door painting and hardware, decorating

Sunday, October 4, 2009

Stairway project - Part 2, hardwood goes in


I'm happy to report, the stair rail and hardwood components are now in place! And boy are they gorgeous.


And here we have on the left, installer extraordinaire Ken. It was an absolute pleasure to have him around to banter with and watch him work his magic. And then there's head slappin' owner John. I know John, I can relate. I'm sorry it's over so soon too. As they say in paradise... "Wish you were here!"


And no project goes unturned without Vic's friendly influence. I owe ya some gas in that ride of yours, my friend!


So, back in  December 2008, we were at this stage. The hardwood components needed some tough love.


First, I gave the pieces a slight beating to remove the perfectness.


Many a night was spent staining and varnishing the pieces. I gave them two coats of stain to deepen the tone and between 4-6 coats of varnish until you could no longer feel the woodgrain with light sanding in between coats. This was a long and labourous task but well worth it. The end result is gorgeous.


Next, came the spindles. Not desiring what the stores carried, because I was after a more industrial feel, I fabricated my own out of 5/8" steel rods trimmed to size on Dan's chop saw. Then a grinder was used to knock off the sharp edges.


The exsisting steps were then notched out to allow for the stair edging placements. ALOT of work!


Here, Ken drills the holes for my custom fabricated spindles. I had to add that part in because I'm so spittin' proud that I had a part in this project!


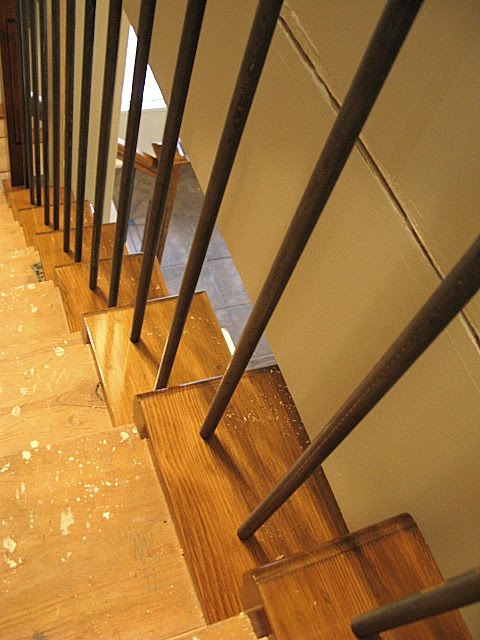
MY spindles get installed! Weeeeeee!!!!!! Oh and they turned out exactly as I imagined. Abit of rust, black and steel shine through. The warmth of the wood against the cold steel is a very cool illusion.


The incredible handrail goes in next. Ken braces things up for a flawless install. Having been without handrails for nearly 2 years, I can't tell you how much I adore these simplistic things most would  take for granted. I don't think I ever will.


Gasp....gorgeous!!!!


Such beautiful edges!


This was one very tricky corner to cut. Ken is my newest hero.


And this is where things stand today. Incredible! All that's left is the carpet running down the center and they are done! Once the carpet is installed, I'll do a before and after on this project.

This was the last major thing left on the house to complete! I honestly think I'm dreaming here.

It's been great having the guys over to make some noise again. I so appreciate this beautiful newest addition. Just more stories and memories to add to the ever growing list around here. Thanks again, all!

Friday, September 25, 2009

Stairway project - Part 1, the spindles

I am estatic to report, the stairway project is commencing!


Meet Ken, stairway installer extraordinaire. And he isn't allowed out of 'rustic metal spindle' jail until he's done. Ah, just kidding Ken. You can go home to eat and stuff.

And you know those spindles I just mentioned? I fabricated them. Simply because, the look I wanted wasn't available in stores anywhere. I wanted rustic metal steel rods to tie in with the rest of the metal influences I have going on. So that step came first.

So off I went to my favorite local workshop. (Dan's place) He showed me what to do and left the room. For the most part anyway. Care to see what transpired?


How do you like THOSE fireworks? I had the MOST fun ever on that day. Not only cutting my own steel rods, but filming it too, as a tutorial for my decorating blog. So, here's the noisy version of the building of the spindles. Welcome to my favorite kind of playground. EVER. :) Thanks Dan!!


To view the film in You Tube, simply select the logo on the far lower right.

Next, stair case woodwork, by Ken! Stay tuned!

Tuesday, September 1, 2009

NEW trim colour goes on!

Well now, with this gorgeous black metal roof intact, it was high time to do some trim work! Here's a peek at the new colour. Black coffee!


Here's a few before's. Yikes.


Yup. The burgundy had to go. The current cranberry trim made the rest of the house look pink.
Ahhhh.... the paint looks just like the hot fudge served up at Dairy Queen. If your paint looks good enough to eat, how can one go wrong?!?
The more paint that went on, the calmer and richer the house slowly appeared. Cool!

Yes. I think this is going to work out very nicely!

And a special thanks goes out to our kitty cat, Teddy Bear. She was my main inspiration. Weird? Perhaps, but she was perfect. She is the most amazing blackish brown colour EVER. You know what they say about you can't go wrong using the colours of nature. Thanks kitten!

I can't wait to do the front door this wonderfully rich warm colour! All the doors! Will do the trim around the door, windows and garage door something different. Some kind of in between colour of the main part of the house and the trim. This is where it gets tricky. The house colour has rose undertones and I don't want the new shade anywhere near pink. Wish me luck!

Next up: finish the trim painting, and we're now discussing getting the stairway completed. The stained and varnished wood is waiting for install day.
More to come very very soon!